
Wednesday, April 17, 2013
Elements of Style Sympathy card
Stamp the large flower on very vanilla using always artichoke. Use the aqua painter to colour in the glowers using river rock, always artichoke and Sahara sand. Layer on always artichoke and use river rock as the base.
Postage due
I love the effect of this card. I stamped the collage image of Postage Due stamp set onto Very Vanilla card stock with not quite navy. I then have torn around the image to create a bit of interest. Next with a strip of island indigo I have embossed using Delicate Designs textured impressions emboss folder. Use the large scallop edgelit die then to cut the edge of card.
stamp the postage stamp on a piece of scrap very vanilla and punch out with the matching punch.

stamp the postage stamp on a piece of scrap very vanilla and punch out with the matching punch.
Saturday, April 13, 2013
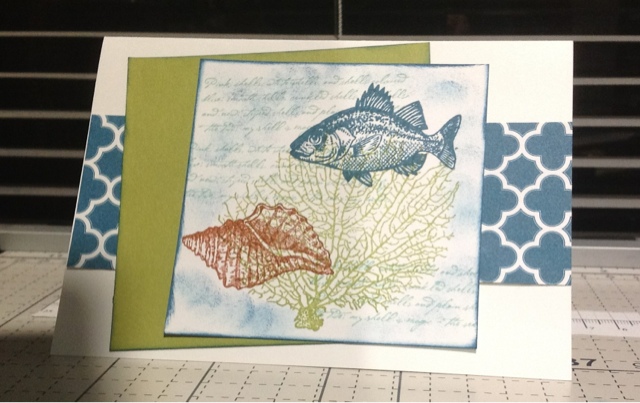
By The Tide meets Parker's Patterns DSP
I love By The Tide stamp set that is in our Seasonal catalogue.
Here are two cards from this set. I BASED my card on Dena's card here. I loved her arrangement of her collages images.
My first card has Parker's Patterns DSP.

Stamp Set used: By the Tide
Ink Used: daffodil delight, marina mist, not quite navy, cajun craze, early expresso,
Cardstock Used: whisper white, not quite navy, parker's patterns dsp
accessories: circle punches
Stamp Set used: By the Tide
Ink Used: baja breeze, lucky limeade, island indigo, cajun craze,
Cardstock Used: whisper white, not quite navy, Sycamore Street dsp
accessories: circle punches
Here are two cards from this set. I BASED my card on Dena's card here. I loved her arrangement of her collages images.
My first card has Parker's Patterns DSP.
Stamp Set used: By the Tide
Ink Used: daffodil delight, marina mist, not quite navy, cajun craze, early expresso,
Cardstock Used: whisper white, not quite navy, parker's patterns dsp
accessories: circle punches
Stamp Set used: By the Tide
Ink Used: baja breeze, lucky limeade, island indigo, cajun craze,
Cardstock Used: whisper white, not quite navy, Sycamore Street dsp
accessories: circle punches
Secret Garden with The Depth of Field technique
I love the clean fresh look of this card which uses The Secret Garden stamp set combined with The Depth of Field technique. I have used this technique before here. I first saw this here . It's a great technique for backgrounds as well as features. You can also see my previous post using this technique here.

Stamp Set Used Stamp: Secret Garden, Perfect Punches
Card stock: whisper white, midnight muse
Ink: tempting turquoise, gumball green, midnight muse and baja breeze
Accessories: Secret Garden Framelits Die, Finishing Touches Edgelits, dimensionals
Stamp Set Used Stamp: Secret Garden, Perfect Punches
Card stock: whisper white, midnight muse
Ink: tempting turquoise, gumball green, midnight muse and baja breeze
Accessories: Secret Garden Framelits Die, Finishing Touches Edgelits, dimensionals
The open sea and blissful bird
I thought I would share a few cards that my downline Rhonda Bailey did for here launch last Saturday.
The first card is using the anchor from The Open Sea set. Love the simplicity of the design. She found here inspiration here: http://lenneman.blogspot.com.au/2011/05/open-sea-cool-border.html
Her second and third card are using the stamp Blissful Bird and The Builder Bird punch.


The first card is using the anchor from The Open Sea set. Love the simplicity of the design. She found here inspiration here: http://lenneman.blogspot.com.au/2011/05/open-sea-cool-border.html
Her second and third card are using the stamp Blissful Bird and The Builder Bird punch.
Saturday, April 6, 2013
Ornament keepsakes meets oval accents bigz die
One of my most popular cards that I taught for Christmas last year was this card.
I started by stamping my bauble on very vanilla from the ornament keepsakes set and cutting it out with the matching die. I then took another piece of very vanilla and cut out the oval accent shape. Now place the oval shape in the Holiday Frame embossing folder and run through the big shot. This shape is so well suited to this embossing folder. Next I took a sponge dauber and dipped in Frost White Shimmer paint and sponged over the raised area of The Holiday Frame tief. To finish the card I placed the ornament embellishment in the centre of the frame and stamped my greeting and used the itty bitty framelit die to cut it out. Mount on card.

I started by stamping my bauble on very vanilla from the ornament keepsakes set and cutting it out with the matching die. I then took another piece of very vanilla and cut out the oval accent shape. Now place the oval shape in the Holiday Frame embossing folder and run through the big shot. This shape is so well suited to this embossing folder. Next I took a sponge dauber and dipped in Frost White Shimmer paint and sponged over the raised area of The Holiday Frame tief. To finish the card I placed the ornament embellishment in the centre of the frame and stamped my greeting and used the itty bitty framelit die to cut it out. Mount on card.
It's been a long time, but now I'm back!
If you look at my previous post you will notice that it was March last year. Life has been hectic. I now work five days and find it difficult to fit everything in so blogging was one of the many things that I have neglected. So over the next few days I want to upload the projects that we have done at Bel Air Creative Card group over the last year. This is my first post using my iPad, it's not as easy as using the computer, but here goes.
My card below is using the masking technique. I saw this technique here http://stampwithtami.com/blog/2012/01/butterfly/
Tami has a great video too to go along with her post.
Firstly, you take a shape die and cut out your mask. Adhere this to the front of your card and then sponge inside the cutout area. Ink up your image (I have used lovely as a tree set) in black and stamp your image in the masked window. Take off your paper and then stamp your greeting.
Stamp set used: lovely as a tree, curly cute
Cardstock: whisper white
Inks: tempting turquise! Marina mist, tangerine tango and more mustard
Accessories: labels collection framlits
Subscribe to:
Posts (Atom)