Sunday, September 7, 2025
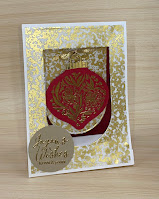
Peace on earth double flap fun fold CASE
Saturday, July 19, 2025
Bauble blooms meets concertina fold
Today’s card uses a technique called concertina fold. The tutorial was from a fellow demonstrator called Connie Stewart. You can view her tutorial here. I modified the measurements for a metric card and also for the width of the bauble aperture in the centre of the card. The bauble make a great aperture.
Decorate the panel with the bauble image and stamp the leaves in balmy blue and the floral in pretty peacock.
Friday, July 18, 2025
Bauble blooms tent fold in balmy blue and night of navy
Another tent fold card today using the bauble blooms bundle.
The second card I used the everyday frames to create the aperture and embossed with the tempting turquoise embossing powder (retired).
Stamps used: Bauble blooms, that’s the tag (retired)
Ink: versamark, night of navy, balmy blue
Card: basic white, night of navy, gold foil, textured 12x12 shimmer paper (160838) retired
Bauble Blooms with gold mercury vellum
A few more samples of cards using the bauble blooms stamp bundle paired with the gold mercury vellum.
The first card on the left is a crumb cake base with a layer of real red and top layer the gold mercury vellum, the second card is just without the middle real red layer. The baubles are stamped in versamark and gold heat embossed.
The third card has half a panel of the gold mercury vellum and a basic white piece of card cut using the everyday arches dies which is embossed with the distressed tile 3d embossing folder (retired) and layered with versamark using the pad directly to the raised embossed pattern then sprinkled with gold embossing powder.
Wednesday, July 16, 2025
Bauble blooms with a Tent fold take 2
Here is another sample of a card using Bauble Blooms with the tent fold technique.
Stamp set: Bauble Blooms, That’s the Tag (retired)
Ink: versamark, real red, shaded spruce Card: basic white, Textured 12x12 Shimmer Paper 160838 (retired), real red, gold foil
Tools: Everyday arches, Bauble Blooms dies, gold embossing powder
Accessories: gold thread
Bauble blooms tent fold
Today I started preparing for my card classes this month and came up with a Tent fold using the stamp set called Bauble Bloom. I tried two versions, crumb cake on the left and Basic White on the right. The photos don’t go the crumb cake justice, it’s stunning, the basic white has photographed really well.
1 piece crumb cake, 23cm x 10.5cm, scored at 1.5cm, 3cm, 4.5cm, 6cm, 7.5cm and 21.5
1piece crumb cake 14.5cm x 10.5cm
1 piece gold mercury vellum (retired) 10cm x 13.5cm
1piece of real red 10cm x 13.5cm
1 piece of real red 10cm x 10cm - die cut the ornament from this
1 piece of scrap crumb cake to die cut a circle for the sentiment
1 pie cod basic white 3cm x 6cm, scored down the middle - this is the mechanism for the back of the die cut window shape.
Stamps used: Bauble Bloom
Card: crumb cake, basic white, real red, gold mercury vellum (retired)
Ink: versamark, real red
Tools: bauble bloom dies, everyday arches, small circle die, gold embossing powder, adhesive sheets (used to attach the vellum to the crumb cake
Thursday, June 12, 2025
Sunrise Sailing Shadowbox Card CASE
Todays card is a case of 2 different Shadowbox cards, one by Kim Fee and the other by Candi Suriano. Be sure to check out their cards, they are awesome.
Shadowbox cards are so easy and fun to make.
What you need:-
1 x A5 basic white card, score at 1.5cm and then 3cm. Rotate 180 degrees and score again at 1.5cm and 3cm. Cut card in half. Burnish and crease all folds. On the front, cut out a circle using the 2nd largest circle from the Stylish Shapes dies. On the pack piece, colour using strawberry slush, timid tiger and darling duckling with blending brushes. This is the backdrop for our boat.
1 x 10.5cm x 3cm basic white, stamp with the Painted Stripes stamp set, firstly in cloud cover, then move to offset the stripe and then stamp in secret sea. Cut in half to give you 2 pieces 1.5cm x 10.5cm.
1 x 8.5cm x 8.5cm basic white, stamp also with the Painted Stripes stamp as before. Using the 2¼" circle punch, cut out the centre. The circle will be discarded, we will use the negative.
Using cloud cover, cut out 2 small clouds and one strip of wave from the dies from the accompanying sunrise sailing die set, then out of secret sea cut some birds and then another wave. Cut also the small boat and sails. Assemble the sail on the boat.
Line the circle negative 8.5cm piece with the front panel, with an even border. Adhere in place. Layer the 2 waves together with the cloud cover on the bottom. Attach to the front of the card covering the bottom of the circles. Stamp also the sentiment under the waves.
On a 1cm x 7cm piece of acetate, attach the boat using glue dots to the right end of the acetate. to work out placement, lay the base flat, then put the acetate with boat attached to the left then layer the top, manoeuvre the piece until it sits on top of the waves. Glue to the back panel inside the first 1.5cm fold. Attach front by adding glue on the front panel inside the 1.5cm fold. Attach to back. Repeat the other side. Crease all folds and watch the sail boat float over the waves. Decorate with the clouds and seagulls. Attach also the 1.5cm strips to the creased folds.
Stamps used: Painted Stripes, Beautiful Butterflies (sentiment)
Dies: Sunrise Sailing, stylish shapes (circle), 2¼" circle punch
Card: basic white, cloud cover, secret sea
Ink: strawberry slush, timid tiger, darling duckling, secret sea, cloud cover
Accessories: Acetate, mini glue dots


